- info@inthings.tech
- Room No. 16/591 Karinkallathani, Chethalloor-PO, Thachanattukara-II Palakkad.

About Inthings
Inthings, founded in May 2019, is a dynamic and innovative technology company driven by a team of visionary entrepreneurs and highly skilled software engineers.
Customers & Affiliations
Blog
Blog
31/01/2026

Custom Object Detection using YOLOv8
Category: Computer Vision
Introduction
Welcome to our comprehensive guide on mastering YOLOv8 for custom object detection training. Whether you are an experienced data scientist or a newcomer to the field of computer vision, this guide is tailored to provide you with essential insights into leveraging the power of YOLOv8 for your specific needs.
Object detection is a critical component in numerous applications spanning surveillance, security, autonomous vehicles, and industrial automation. Recognized for its exceptional speed and accuracy, YOLOv8, an abbreviation for You Only Look Once version 8, stands as a cutting-edge deep learning model in the realm of object detection in both images and videos.
In this blog post, we embark on a journey to explore the fundamentals of YOLOv8, guiding you through practical steps to train custom models that align precisely with your objectives. Whether you aim to enhance your expertise as a seasoned professional or are keen to expand your knowledge as an enthusiast, this guide equips you with the necessary tools to succeed in your object detection endeavors.
Join us as we delve into the intricacies of YOLOv8 and unlock its full potential together.
Understanding YOLOv8
YOLOv8 is an advanced object detection algorithm that stands for "You Only Look Once." It's a deep learning model known for its exceptional speed and accuracy in identifying objects within images and videos. Unlike traditional object detection methods that rely on multiple stages and complex processing pipelines, YOLOv8 processes the entire image in a single pass, making it incredibly efficient.
Key Features of YOLOv8:
- Single-Shot Detection: YOLOv8 can detect objects in real-time with just one pass through the neural network, making it suitable for applications requiring fast and accurate detection, such as autonomous driving and surveillance systems.
- Anchor-Based Detection: YOLOv8 employs anchor boxes to predict bounding boxes for objects of different sizes and aspect ratios within an image. This enables robust detection of objects regardless of their scale or orientation.
- Feature Pyramid Network (FPN): YOLOv8 utilizes an FPN architecture to extract multi-scale features from the input image, allowing it to detect objects at various resolutions and levels of detail.
- Darknet-53 Backbone: YOLOv8 is built upon the Darknet-53 convolutional neural network architecture, which serves as a powerful feature extractor. The Darknet-53 backbone enables YOLOv8 to learn rich representations of visual data, enhancing its detection performance.
Custom Training Data Preparation
To ensure the effectiveness of YOLOv8 for custom object detection tasks, it's crucial to prepare high-quality training data. This involves collecting, annotating, and preprocessing datasets tailored to your specific application.
YOLOv8 Dataset Structure:
Before delving into data preparation, it's essential to understand the typical structure of datasets used with YOLOv8. The dataset should consist of:
A YAML file:
This YAML file contains:
- Path to image folders of training, validation, and test folders
- Number of classes
- Class number with its corresponding names
- Additionally, it can include the dataset download link and ownership information.
Annotation folders:
It contains annotations of each image. Each folder like train, test, and val contains an image folder and annotation folder. The annotations are in text files and the structure is:
0 0.481715 0.634028 0.690625 0.713278
0 0.741094 0.524306 0.314750 0.933389
27 0.364844 0.795833 0.078125 0.400000
- class number
- middle point of object (x)
- middle point of object (y)
- width of object from the middle point
- height of object from the middle point
So, mathematically, the total width of the object is width + middle point of object (x) and total height of object is height + middle point of object (y).
An image folder:
It contains images with objects organized as follows:
                                        |── images /
                                        |   |── train/
                                        |   |   |── 000001.jpg
                                        |   |   |── 000008.jpg
                                        |   |   |── 000032.jpg
                                        |   |── val/
                                        |   |   |── 000003.jpg
                                        |   |   |── 000007.jpg
                                        |   |   |── 000010.jpg
                                        |   |── test/ (optional)
                                        |   |   |── 000006.jpg
                                        |   |   |── 000009.jpg
                                        |   |   |── 000017.jpg
                                        |── labels /
                                        |   |── train/
                                        |   |   |── 000001.txt
                                        |   |   |── 000008.txt
                                        |   |   |── 000032.txt
                                        |   |── val/
                                        |   |   |── 000003.txt
                                        |   |   |── 000007.txt
                                        |   |   |── 000010.txt
                                        |   |── test/ (optional)
                                        |   |   |── 000006.txt
                                        |   |   |── 000009.txt
                                        |   |   |── 000017.txt
                                        |── data.yaml
Practical Example: Custom Detection with YOLOv8
In this practical guide, we'll delve into the process of custom object detection using YOLOv8. Instead of overwhelming you with theoretical concepts, we'll take a hands-on approach by walking through the creation of a custom detection model for a specific use case: bee detection.
By following along with this example, you'll gain a clear understanding of how to train a custom detection model with YOLOv8. Let's jump right in and explore the world of custom object detection together!
Step-by-Step Bee Detection Workflow:
- Data Collection: Gather images of bees in diverse environments—on flowers, in flight, and near hives—to ensure the model generalizes well.
- Annotation: Use tools like LabelImg or Roboflow to draw bounding boxes around each bee, saving them in the YOLO
.txtformat discussed in the previous section. - Configuration: Create a
bee_data.yamlfile defining the paths to your "train" and "val" folders, withnc: 1andnames: ['bee']. - Training: Execute the training script using the Ultralytics Python API:
model = YOLO('yolov8n.pt')model.train(data='bee_data.yaml', epochs=50, imgsz=640)
Once training is complete, your model will be able to identify bees in real-time video streams, providing a foundation for agricultural monitoring or ecological research.
Data Collection: Obtaining Bee Detection Dataset
To begin our custom detection journey, we need a dataset tailored to our task. There are several avenues for acquiring such data:
- Online Sources: Numerous datasets are available online, covering a wide range of object detection tasks. These can be found on platforms like Kaggle, GitHub, or academic repositories.
- Custom Dataset Creation: For more specialized tasks, creating a custom dataset may be necessary. Tools like CVAT (Computer Vision Annotation Tool) or Roboflow can assist in annotating images to generate custom datasets.
- Kaggle: Kaggle, in particular, hosts a vast collection of datasets contributed by the community. We'll utilize a bee detection dataset from Kaggle for our example.
Let's proceed by obtaining the bee detection dataset from Kaggle.
Data Preprocessing: Converting to YOLOv8 Format
Before we can train our YOLOv8 model, we need to preprocess our dataset to adhere to the YOLOv8 format. Here's how we'll accomplish this:
- Understanding the Structure: Familiarize yourself with the structure of the downloaded dataset. In our case, it's a Pascal-type dataset consisting of images and XML annotations.
- YOLOv8 Dataset Structure: Referencing the YOLOv8 dataset structure, we'll need to convert our dataset accordingly. The YOLOv8 dataset typically comprises image files and corresponding annotation files, containing class numbers and bounding box (bbox) values.
- Converting Annotations: Extract the necessary information from the XML annotations, such as object names and bbox values. Use this information to create YOLO annotation files. This can be achieved using Python scripts or any suitable tool.
- Folder Structure: Organize the dataset into a specific folder structure. Create a root folder for the dataset, containing subfolders for images and annotations. The image folder should contain image files, while the annotation folder should contain text files with class numbers and bbox values.
- YAML File: Finally, create a YAML file that specifies the paths to the image and annotation folders, along with class numbers and corresponding class names. Ensure that the class numbers align correctly with the object names and are consistent across annotation files to avoid issues during model training.
Info: For detailed instructions on dataset preparation and folder structure, please refer to the "Custom Training Data Preparation" section in this blog post. Additionally, you can consult the Ultralytics documentation for dataset guidelines and examples.
Model Selection
YOLOv8 offers various methods for training custom models:
- Building a New Model from YAML:
model = YOLO('yolov8n.yaml') - You can define a new model architecture by specifying the configuration in a YAML file.
- Loading a Pretrained Model (Recommended for Training):
model = YOLO('yolov8n.pt') - It's recommended to start with a pretrained model for efficient training. You can load a pre-trained YOLOv8 model directly.
- Building from YAML and Transferring Weights:
model = YOLO('yolov8n.yaml').load('yolov8n.pt') - This approach involves building a model architecture from a YAML file and then transferring weights from a pretrained model.
Choose the method that best suits your requirements and training objectives. Each method offers its own advantages and can be tailored to your specific use case.
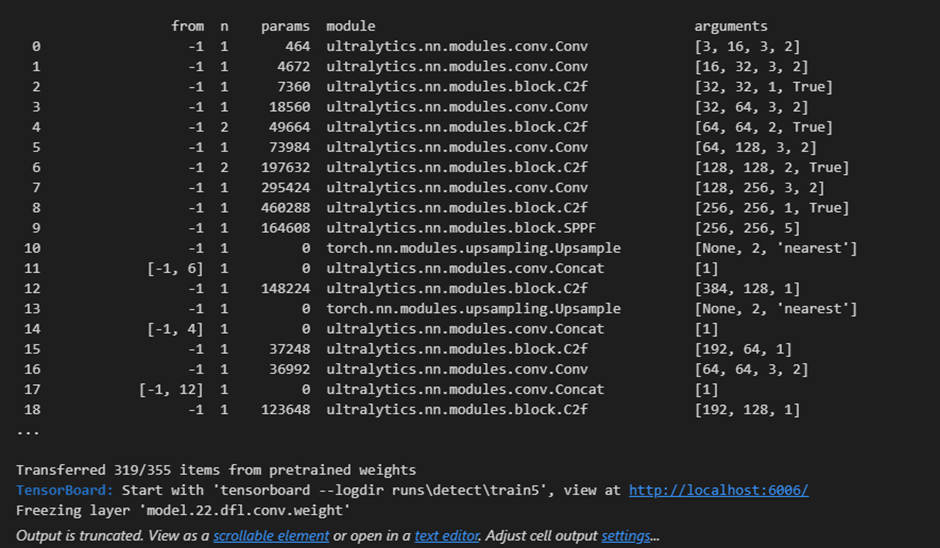
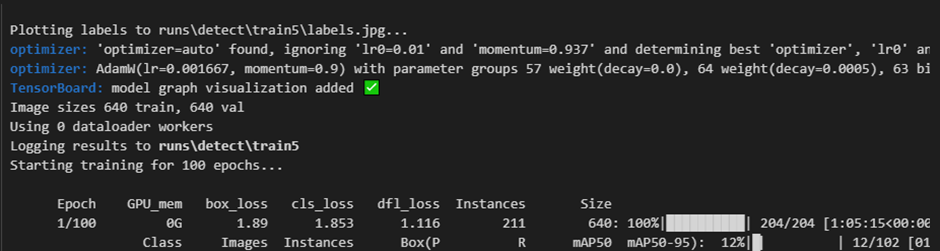
1. Training: Fine-tuning the Model
Training a custom YOLOv8 model involves fine-tuning the network on your specific dataset to learn to detect objects accurately. Below is a basic training script provided by Ultralytics:
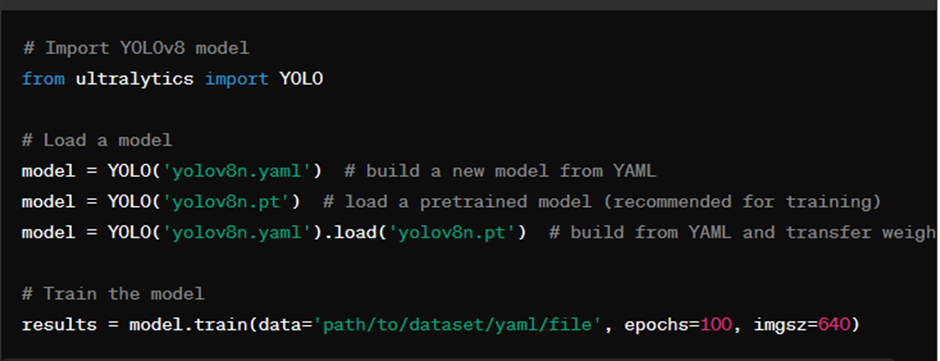
In the training script:
- Import YOLOv8 Model: Import the YOLOv8 model from the defined module.
- Load a model: Load the model configuration from a YAML file.
- Start Training: Initiate the training process by specifying the dataset path, number of epochs, batch size, and image size.
Required parameters:
- data: Path to the dataset yaml file.
- epochs: Number of training epochs (iterations over the entire dataset).
- imgsz: Input image size for training (default is 640x640 pixels).
Possible parameters for customizing training include:
Model, Data, Epochs, Time, Patience, Batch, Img Size, Save, Save Period, Cache, Device, Workers, Project, Name, Exist Ok, Pretrained, Optimizer, Verbose, Seed, Deterministic, Single CLS, Rect, Cosine LR, Close Mosaic, Resume, Automatic Mixed Precision, Fraction, Profile, Freeze, Initial Learning Rate, Final Learning Rate, Momentum, Weight Decay, Warmup Epochs, Warmup Momentum, Warmup Bias LR, Box Weight, Classification Weight, Distribution Focal Loss Weight, Pose Loss Weight, Keypoint Objectness Loss Weight, Label Smoothing, Nominal Batch Size, Overlap Mask, Mask Ratio, Dropout, Validation, Plots.
Adjust these parameters according to your dataset size, hardware capabilities, and training objectives to optimize the training process and achieve the desired results.
Exporting the Model for Deployment
After training your custom YOLOv8 model, you may want to export it to different formats for deployment or integration into other frameworks. Ultralytics provides various options for model export:
- TorchScript
- ONNX
- OpenVINO
- TensorRT
- CoreML
- TF SavedModel
- TF GraphDef
- TF Lite
- TF Edge TPU
- TF.js
- PaddlePaddle
- NCNN
You can export the model using the export method with the desired format specified. Here's a sample export script:

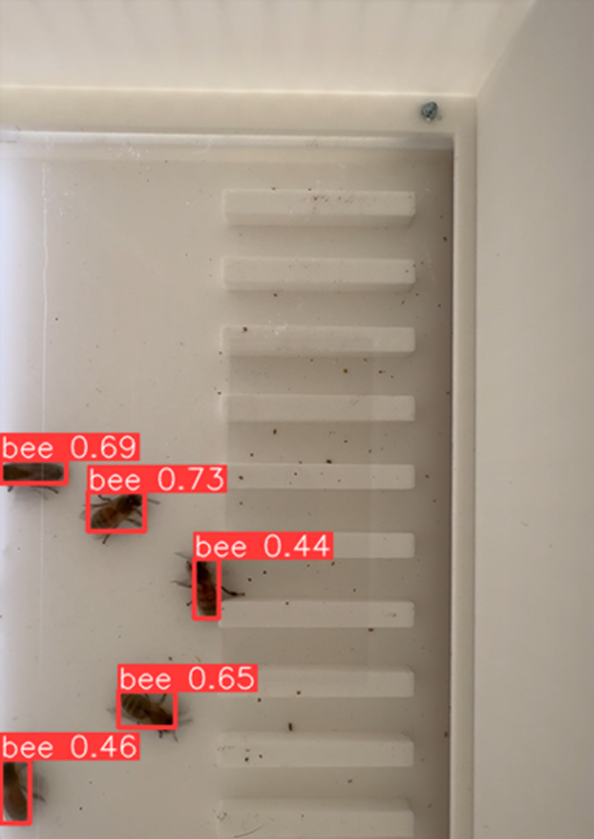
Sample Detection: Evaluating Your Trained Model
After training your custom YOLOv8 model, it's essential to evaluate its performance on sample images or videos to ensure its accuracy and reliability in real-world scenarios. In this section, we'll demonstrate how to perform sample detection using your trained model and interpret the results.
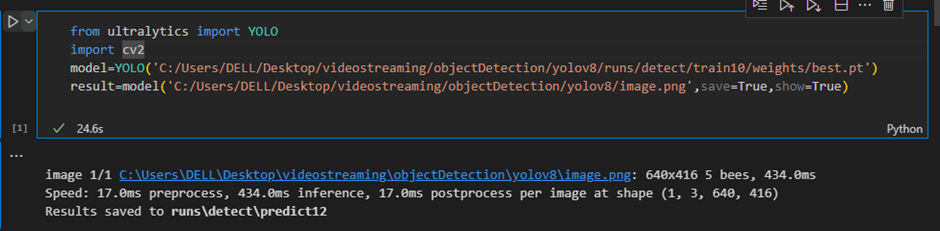
You can test the model detection simply by running the following code:
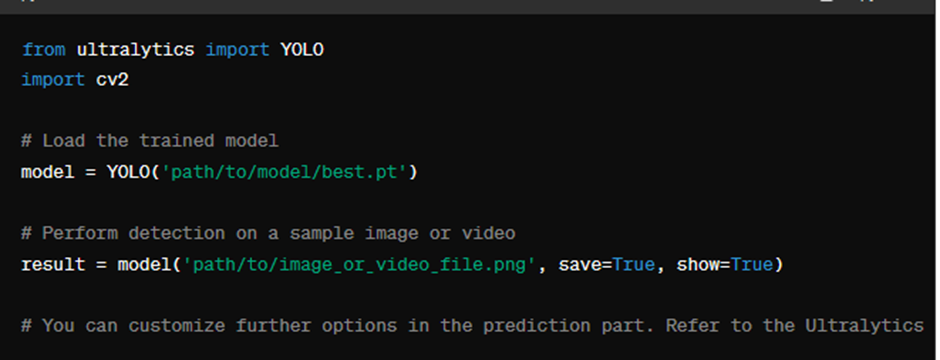
Info: The model is typically generated in therunsfolder. Make sure to setsaveandshowto True if you need to save or display the detection results.
Conclusion
In Conclusion, this blog offers a thorough exploration of YOLOv8 for custom object detection training, suitable for both experts and beginners in computer vision. It covers YOLOv8's key features, data preparation, model selection, training, and model deployment. The practical example of bee detection illustrates these concepts in action. By combining theory with practical guidance, this guide equips readers with the skills to effectively leverage YOLOv8 for their object detection projects.
For inquiries regarding the development of a Computer Vision solution, please contact us at info@inthings.tech today.